JBoss EAP MessageBean的调用(Topic)

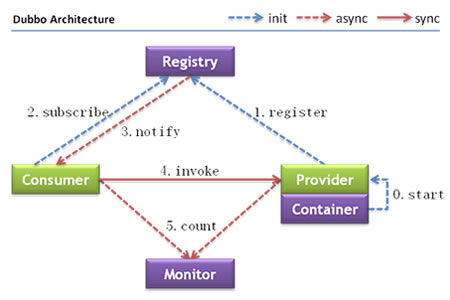
通讯流程图,其中EJB扮演了client2的角色
jms-publisher-subscriber-model.png

首先是Server端的开发及设置:
1、增加一个用户:

bin\add-user.bat

用户名密码随便,但要属于guest组

2、启动Server

standalone.bat -server-config=standalone-full.xml 

3、新建Topic

jboss-cli.bat --connect
jms-topic add --topic-address=neoTopic --entries=topic/neoTopic,java:jboss/exported/jms/topic/neoTopic

4、新建java项目
4.1、写一个TopicBean
MessageTopicBean .java

package com.neohope.ejb.test;

import javax.ejb.ActivationConfigProperty;
import javax.ejb.MessageDriven;
import javax.jms.JMSException;
import javax.jms.Message;
import javax.jms.TextMessage;

/**
 * Created by Hansen
 */
@MessageDriven(mappedName = "MessageTopicBean",activationConfig = {
        @ActivationConfigProperty(propertyName = "destinationType", propertyValue = "javax.jms.Topic"),
        @ActivationConfigProperty(propertyName = "destination", propertyValue = "topic/neoTopic"),
        @ActivationConfigProperty(propertyName = "acknowledgeMode", propertyValue = "Auto-acknowledge")
})
public class MessageTopicBean implements javax.jms.MessageListener {
    public MessageTopicBean() {
    }

    @Override
    public void onMessage(Message message) {
        try {
            System.out.println("MessageTopicBean.onMessage invoked");
            if(message instanceof TextMessage)
            {
                TextMessage textMessage = (TextMessage)message;
                System.out.println("Message: " + textMessage.getText());
            }
            else
            {
                System.out.println("Message is not a TextMessage");
            }
        }
        catch (JMSException e) {
            e.printStackTrace();
        }
    }
}

4.2、打jar包,或者自己压缩为TestEJBServer.jar

5、新建一个ear项目
5.1增加application.xml文件

<?xml version="1.0" encoding="UTF-8"?>
<application xmlns="http://java.sun.com/xml/ns/javaee"
             xmlns:xsi="http://www.w3.org/2001/XMLSchema-instance"
             xsi:schemaLocation="http://java.sun.com/xml/ns/javaee http://java.sun.com/xml/ns/javaee/application_6.xsd"
             version="6">
    <description>EAR Test</description>
    <display-name>EAR Test</display-name>
    <module>
        <ejb>TestEJBServer.jar</ejb>
    </module>
    <library-directory>lib</library-directory>
</application>

5.2打ear包,或自己压缩为TestEar.ear

5.3TestEar的结构为:

│  TestEJBServer.jar
│
├─lib
└─META-INF
        application.xml

6.通过EAP进行部署

到这里服务端已经完成了。

然后是客户端的设置:
1、通过Topic方式访问

package com.neohope.ejb.test;

import javax.jms.*;
import javax.naming.Context;
import javax.naming.InitialContext;
import javax.naming.NamingException;
import java.util.Hashtable;

/**
 * Created by Hansen
 */
public class TestTopicBean {
    public static void main(String[] args) throws NamingException, JMSException {

        final Hashtable jndiProperties = new Hashtable();
        jndiProperties.put(Context.INITIAL_CONTEXT_FACTORY, "org.jboss.naming.remote.client.InitialContextFactory");
        jndiProperties.put(Context.PROVIDER_URL, "remote://localhost:4447");
        final InitialContext ctx = new InitialContext(jndiProperties);


        TopicConnectionFactory factory = (TopicConnectionFactory) ctx.lookup("jms/RemoteConnectionFactory");
        TopicConnection connection = factory.createTopicConnection("user001", "user001#");
        TopicSession session = connection.createTopicSession(false, TopicSession.AUTO_ACKNOWLEDGE);

        Topic topic = (Topic) ctx.lookup("jms/topic/neoTopic");
        TextMessage msg = session.createTextMessage("Topic Test Message");
        TopicPublisher publisher = session.createPublisher(topic);
        publisher.publish(msg);

        session.close();
        connection.close();
    }
}

2、通过MessageProducer方式访问

package com.neohope.ejb.test;

import javax.jms.*;
import javax.naming.Context;
import javax.naming.InitialContext;
import javax.naming.NamingException;
import java.util.Hashtable;

/**
 * Created by Hansen
 */
public class TestTopicBean {
    public static void main(String[] args) throws NamingException, JMSException {
        final Hashtable jndiProperties = new Hashtable();
        jndiProperties.put(Context.INITIAL_CONTEXT_FACTORY, "org.jboss.naming.remote.client.InitialContextFactory");
        jndiProperties.put(Context.PROVIDER_URL, "remote://localhost:4447");
        final InitialContext ctx = new InitialContext(jndiProperties);

        ConnectionFactory connectionFactory = (ConnectionFactory) ctx.lookup("jms/RemoteConnectionFactory");
        Destination destination = (Destination) ctx.lookup("jms/topic/neoTopic");
        Connection connection = connectionFactory.createConnection("user001", "user001#");
        Session session = connection.createSession(false, Session.AUTO_ACKNOWLEDGE);
        MessageProducer producer = session.createProducer(destination);
        connection.start();

        TextMessage msg = session.createTextMessage("Topic Test Messagee");
        producer.send(msg);

        session.close();
        connection.close();
    }
}

JBoss EAP SessionBean的调用

首先是Server端的开发及设置:
1、增加一个用户:

bin\add-user.bat

用户名密码随便,但要属于guest组

2、启动Server

standalone.bat -server-config=standalone-full.xml 

3、新建java项目
3.1、写SessionBean的接口
ITest.java

package com.neohope.ejb.test;

import javax.ejb.Remote;

/**
 * Created by Hansen
 */

@Remote
public interface ITest{
    /**
     * 返回“Hi XXX"字符串,必须声明抛出RemoteException异常
     * @return 返回“Hi XXX"字符串
     */
    public String sayHiTo(String user);

    /**
     * 加法,必须声明抛出RemoteException异常
     * @param a
     * @parma b
     * @return a+b
     */
    public int add(int a, int b);
}

3.2、写一个无状态的SessionBean
SessionTestBean.java

package com.neohope.ejb.test;

import javax.ejb.Stateless;

/**
 * Created by Hansen
 */
@Stateless(name = "SessionTestEJB")
public class SessionTestBean implements ITest{
    public SessionTestBean() {
    }

    /**
     * 返回“Hi XXX"字符串,必须声明抛出RemoteException异常
     * @return 返回“Hi XXX"字符串
     */
    @Override
    public String sayHiTo(String user) {
        return "Hi " + user;
    }

    /**
     * 加法,必须声明抛出RemoteException异常
     * @param a
     * @parma b
     * @return a+b
     */
    @Override
    public int add(int a, int b) {
        return a+b;
    }
}

3.3、打jar包,或者自己压缩为TestEJBServer.jar

4、新建一个ear项目
4.1增加application.xml文件

<?xml version="1.0" encoding="UTF-8"?>
<application xmlns="http://java.sun.com/xml/ns/javaee"
             xmlns:xsi="http://www.w3.org/2001/XMLSchema-instance"
             xsi:schemaLocation="http://java.sun.com/xml/ns/javaee http://java.sun.com/xml/ns/javaee/application_6.xsd"
             version="6">
    <description>EAR Test</description>
    <display-name>EAR Test</display-name>
    <module>
        <ejb>TestEJBServer.jar</ejb>
    </module>
    <library-directory>lib</library-directory>
</application>

4.2打ear包,或自己压缩为TestEar.ear

4.3TestEar的结构为:

│  TestEJBServer.jar
│
├─lib
└─META-INF
        application.xml

5.通过EAP进行部署,部署后,会输出绑定结果

java:global/TestEar/TestEJBServer/SessionTestEJB!com.neohope.ejb.test.ITest
java:app/TestEJBServer/SessionTestEJB!com.neohope.ejb.test.ITest
java:module/SessionTestEJB!com.neohope.ejb.test.ITest
java:jboss/exported/TestEar/TestEJBServer/SessionTestEJB!com.neohope.ejb.test.ITest
java:global/TestEar/TestEJBServer/SessionTestEJB
java:app/TestEJBServer/SessionTestEJB
java:module/SessionTestEJB

到这里服务端已经完成了。

然后是客户端的设置:
1、在scr下新增配置文件jboss-ejb-client.properties

endpoint.name=client-endpoint
remote.connectionprovider.create.options.org.xnio.Options.SSL_ENABLED=false
remote.connections=default
remote.connection.default.host=localhost
remote.connection.default.port = 4447
remote.connection.default.connect.options.org.xnio.Options.SASL_POLICY_NOANONYMOUS=false
remote.connection.default.username=user001
remote.connection.default.password=user001#

2、通过ejb方式访问

package com.neohope.ejb.test;

import javax.jms.*;
import javax.naming.Context;
import javax.naming.InitialContext;
import javax.naming.NamingException;
import java.util.Hashtable;

/**
 * Created by Hansen
 */
public class TestSessionBean{
    public static void main(String[] args) throws NamingException, JMSException {
        final Hashtable jndiProperties = new Hashtable();
        jndiProperties.put(Context.URL_PKG_PREFIXES, "org.jboss.ejb.client.naming");

        final Context ctx = new InitialContext(jndiProperties);
        final String appName = "TestEar";
        final String moduleName = "TestEJBServer";
        final String distinctName = "";
        final String beanName = "SessionTestEJB";
        final String viewClassName = ITest.class.getName();
        final String namespace = "ejb:" + appName + "/" + moduleName + "/" + distinctName + "/" + beanName + "!" + viewClassName;
        System.out.println(namespace);
        ITest test =  (ITest)ctx.lookup(namespace);

        System.out.println(test.sayHiTo("neohope"));
        System.out.println(test.add(1,2));
    }
}

3、通过JMS方式访问

package com.neohope.ejb.test;

import javax.jms.Connection;
import javax.jms.ConnectionFactory;
import javax.jms.JMSException;
import javax.jms.Session;
import javax.naming.Context;
import javax.naming.InitialContext;
import javax.naming.NamingException;
import java.util.Hashtable;

/**
 * Created by Hansen
 */
public class TestSessionBean{
    public static void main(String[] args) throws NamingException, JMSException {
        final Hashtable jndiProperties = new Hashtable();
        jndiProperties.put(Context.INITIAL_CONTEXT_FACTORY, "org.jboss.naming.remote.client.InitialContextFactory");
        jndiProperties.put(Context.PROVIDER_URL, "remote://localhost:4447");
        final InitialContext ctx = new InitialContext(jndiProperties);

        ConnectionFactory factory = (ConnectionFactory) ctx.lookup("jms/RemoteConnectionFactory");
        Connection connection = factory.createConnection("user001", "user001#");
        Session session = connection.createSession(false, Session.AUTO_ACKNOWLEDGE);

        ITest test = (ITest) ctx.lookup("TestEar/TestEJBServer/SessionTestEJB!com.neohope.ejb.test.ITest");

        session.close();
        connection.close();
        System.out.println(test.sayHiTo("neohope"));
        System.out.println(test.add(1,2));
    }
}

通过LDAP初步理解JNDI

LDAP与JNDI模型对比
jndi-ldap-model

1、LdapBinder
这个类的主要功能是,把消息放到一个预设的LDAP路径

package com.neohope.jndi.test;

import javax.naming.Binding;
import javax.naming.Context;
import javax.naming.NamingEnumeration;
import javax.naming.directory.DirContext;
import javax.naming.directory.InitialDirContext;
import java.util.Hashtable;

/**
 * Created by Hansen
 */
public class LdapBinder {

    public static void main(String[] args) {
        try {
            final Hashtable jndiProperties = new Hashtable();
            jndiProperties.put(Context.INITIAL_CONTEXT_FACTORY, "com.sun.jndi.fscontext.RefFSContextFactory");
            jndiProperties.put(Context.PROVIDER_URL, "file:///d:/Downloads/ldap");
            //jndiProperties.put(Context.INITIAL_CONTEXT_FACTORY, "com.sun.jndi.ldap.LdapCtxFactory");
            //jndiProperties.put(Context.PROVIDER_URL, "ldap://localhost:389");
            //jndiProperties.put(Context.SECURITY_PRINCIPAL,"cn=Directory Manager");
            //jndiProperties.put(Context.SECURITY_CREDENTIALS,"password");

            DirContext ctx = new InitialDirContext(jndiProperties);
            NeoLdapMsgRef msgRef = new NeoLdapMsgRef("Ldap Text");
            ctx.bind("cn=anobject", msgRef);
            //ctx.unbind("cn=anobject");

            /*
            NamingEnumeration list = ctx.list("/");
            while (list.hasMore()) {
                NameClassPair nc = (NameClassPair) list.next();
                System.out.println(nc);
            }
            */

            NamingEnumeration list = ctx.listBindings("/");
            while (list.hasMore()) {
                Binding binding = (Binding)list.next();
                System.out.println(binding.getName() + " " +binding.getObject()
                );
            }

            ctx.close();
        } catch (Exception e) {
            e.printStackTrace();
        }
    }
}

2、LdapReader
这个类的主要功能是,从预设的LDAP路径读取消息

package com.neohope.jndi.test;

import javax.naming.Context;
import javax.naming.directory.DirContext;
import javax.naming.directory.InitialDirContext;
import java.util.Hashtable;

/**
 * Created by Hansen
 */
public class LdapReader {

    public static void main(String[] args) {
        try {
            final Hashtable jndiProperties = new Hashtable();
            jndiProperties.put(Context.INITIAL_CONTEXT_FACTORY, "com.sun.jndi.fscontext.RefFSContextFactory");
            jndiProperties.put(Context.PROVIDER_URL, "file:///d:/Downloads/ldap");

            //jndiProperties.put(Context.INITIAL_CONTEXT_FACTORY, "com.sun.jndi.ldap.LdapCtxFactory");
            //jndiProperties.put(Context.PROVIDER_URL, "ldap://localhost:389");
            //jndiProperties.put(Context.SECURITY_PRINCIPAL,"cn=Directory Manager");
            //jndiProperties.put(Context.SECURITY_CREDENTIALS,"password");

            DirContext ctx = new InitialDirContext(jndiProperties);
            NeoLdapMsgRef msgRef = (NeoLdapMsgRef)ctx.lookup("cn=anobject");
            ctx.close();

            System.out.println(msgRef.message);

        } catch (Exception e) {
            e.printStackTrace();
        }
    }
}

3、LdapMonitor
这个类的主要功能是,监视LDAP路径下内容变动

package com.neohope.jndi.test;

import javax.naming.Context;
import javax.naming.directory.DirContext;
import javax.naming.directory.InitialDirContext;
import javax.naming.event.*;
import javax.naming.ldap.UnsolicitedNotificationEvent;
import javax.naming.ldap.UnsolicitedNotificationListener;
import java.util.Hashtable;

/**
 * Created by Hansen
 * 条件所限,没有进行测试
 */
public class LdapMonitor {

    public static void main(String[] args) {
        try {
            final Hashtable jndiProperties = new Hashtable();
            jndiProperties.put(Context.INITIAL_CONTEXT_FACTORY, "com.sun.jndi.ldap.LdapCtxFactory");
            jndiProperties.put(Context.PROVIDER_URL, "ldap://localhost:389");
            jndiProperties.put(Context.SECURITY_PRINCIPAL,"cn=Manager");
            jndiProperties.put(Context.SECURITY_CREDENTIALS,"password");

            DirContext ctx = new InitialDirContext(jndiProperties);
            EventDirContext enentCtx=(EventDirContext)(ctx.lookup("/"));

            NamingListener unsolListener = new UnsolicitedNotificationListener() {
                public void notificationReceived(UnsolicitedNotificationEvent evt) {
                    System.out.println("received: " + evt + ",notification:" + evt.getNotification());
                }

                public void namingExceptionThrown(NamingExceptionEvent evt) {
                    System.out.println(">>> UnsolListener got an exception");
                    evt.getException().printStackTrace();
                }
            };

            NamingListener namespaceListener = new NamespaceChangeListener() {
                public void objectAdded(NamingEvent evt) {
                    System.out.println("objectAdded: " + evt.getOldBinding() + "\n=> " + evt.getNewBinding());
                    System.out.println("\tchangeInfo: " + evt.getChangeInfo());
                }

                public void objectRemoved(NamingEvent evt) {
                    System.out.println("objectRemoved: " + evt.getOldBinding() + "\n=> " + evt.getNewBinding());
                    System.out.println("\tchangeInfo: " + evt.getChangeInfo());
                }

                public void objectRenamed(NamingEvent evt) {
                    System.out.println("objectRenamed: " + evt.getOldBinding() + "\n=> " + evt.getNewBinding());
                    System.out.println("\tchangeInfo: " + evt.getChangeInfo());
                }

                public void namingExceptionThrown(NamingExceptionEvent evt) {
                    System.err.println(">>>NamespaceChangeListener Exception");
                    evt.getException().printStackTrace();
                }
            };

            NamingListener objectListener = new ObjectChangeListener() {
                public void objectChanged(NamingEvent evt) {
                    System.out.println("objectChanged: " + evt.getOldBinding() + "\n\t=> " + evt.getNewBinding());
                    System.out.println("\tchangeInfo: " + evt.getChangeInfo());
                }

                public void namingExceptionThrown(NamingExceptionEvent evt) {
                    System.err.println(">>>ObjectChangeListener Exception");
                    evt.getException().printStackTrace();
                }
            };

            enentCtx.addNamingListener("", EventContext.SUBTREE_SCOPE, unsolListener);
            enentCtx.addNamingListener("", EventContext.SUBTREE_SCOPE, namespaceListener);
            enentCtx.addNamingListener("", EventContext.SUBTREE_SCOPE, objectListener);

            System.in.read();

            //enentCtx.close();
            ctx.close();
        } catch (Exception e) {
            e.printStackTrace();
        }
    }
}

4、NeoLdapMsgRef

package com.neohope.jndi.test;

import javax.naming.NamingException;
import javax.naming.Reference;
import javax.naming.Referenceable;
import javax.naming.StringRefAddr;

/**
 * Created by Hansen
 */
public class NeoLdapMsgRef implements Referenceable {
    public String message = "";

    public NeoLdapMsgRef(String message)
    {
        this.message = message;
    }

    @Override
    public Reference getReference() throws NamingException {
        Reference ref = new Reference(this.getClass().getName(), NeoLdapMsgRefFactory.class.getName(), null);
        ref.add(new StringRefAddr("msg", message));
        return ref;
    }
}

5、NeoLdapMsgRefFactory

package com.neohope.jndi.test;

import javax.naming.*;
import javax.naming.spi.ObjectFactory;
import java.util.Hashtable;

/**
 * Created by Hansen
 */
public class NeoLdapMsgRefFactory implements ObjectFactory {
    @Override
    public Object getObjectInstance(Object obj, Name name, Context nameCtx, Hashtable<?, ?> environment) throws Exception {
        if (obj instanceof Reference) {
            Reference ref = (Reference) obj;
            String msg = (String) ref.get("msg").getContent();
            NeoLdapMsgRef msgRef = new NeoLdapMsgRef(msg);
            return msgRef;
        }
        else {
            return null;
        }
    }
}

LADP常用函数

LADP操作 解释 JNDI函数
Search Search directory for matching directory entries DirContext.search()
Compare Compare directory entry to a set of attributes DirContext.search()
Add Add a new directory entry DirContext.bind(), DirContext.createSubcontext()
Modify Modify a particular directory entry DirContext.modifyAttributes()
Delete Delete a particular directory entry Context.unbind(), Context.destroySubcontext()
Rename Rename or modify the DN Context.rename()
Bind Start a session with an LDAP server new InitialDirContext()
Unbind End a session with an LDAP server Context.close()
Abandon Abandon an operation previously sent to the server Context.close(), NamingEnumneration.close()
Extended Extended operations command LdapContext.extendedOperation()

LADP查询常用符号

o Organization
ou Organizational unit
cn Common name
sn Surname
givenname First name
uid Userid
dn Distinguished name
mail Email address

LADP查询常用操作符

符号 含义 示例 匹配示例
~ Approximate (sn~=Tyagi) Tyagi or variations in spelling
= Equality (sn=Tyagi) Surname of Tyagi only
> Greater than (sn=Tyagi) Any surname that alphabetically follows Tyagi
>= Greater than or equal to (sn>=Tyagi) Any surname that includes or alphabetically follows Tyagi
< Less than (sn Any surname that alphabetically precedes Tyagi
<= Less than or equal to (sn<=Tyagi) Any surname that includes or alphabetically precedes Tyagi
=* Presence (sn=*) All surnames (all entries with the sn attribute)
Substring (sn=Tya*), (sn=*yag*), (sn=Ty*g*) Any matching string, substring, or superstring that matches Tyagi
& And (&(sn=Tyagi) (cn=Sameer Tyagi)) Any entry that matches both surname of Tyagi and a common name of Sameer Tyagi
| Or (|(sn=Tyagi) (cn=Sameer Tyagi)) Any entry that matches either surname of Tyagi or a common name of Sameer Tyagi
! Not (!(sn=Tyagi)) Any entry other than that with a surname of Tyagi

通过JMS初步理解JNDI

JNDI服务模型
jndi-model

1、服务端

package com.neohope.jndi.test;

import javax.naming.Context;
import javax.naming.InitialContext;
import javax.naming.NamingException;
import java.io.IOException;
import java.rmi.RemoteException;
import java.rmi.registry.LocateRegistry;
import java.util.Hashtable;

/**
 * Created by Hansen on 2016/5/4.
 */
public class Server {
    private static InitialContext ctx;

    public static void initJNDI() {
        try {
            LocateRegistry.createRegistry(1234);
            final Hashtable jndiProperties = new Hashtable();
            jndiProperties.put(Context.INITIAL_CONTEXT_FACTORY, "com.sun.jndi.rmi.registry.RegistryContextFactory");
            jndiProperties.put(Context.PROVIDER_URL, "rmi://localhost:1234");
            ctx = new InitialContext(jndiProperties);
        } catch (NamingException e) {
            e.printStackTrace();
        } catch (RemoteException e) {
            e.printStackTrace();
        }
    }

    public static void bindJNDI(String name, Object obj) throws NamingException {
        ctx.bind(name, obj);
    }

    public static void unInitJNDI() throws NamingException {
        ctx.close();
    }

    public static void main(String[] args) throws NamingException, IOException {
        initJNDI();
        NeoMessage msg = new NeoMessage("Just A Message");
        bindJNDI("java:com/neohope/jndi/test01", msg);
        System.in.read();
        unInitJNDI();
    }
}

2、客户端

package com.neohope.jndi.test;

import javax.naming.Context;
import javax.naming.InitialContext;
import javax.naming.NamingException;
import java.util.Hashtable;

/**
 * Created by Hansen
 */
public class Client {
    public static void main(String[] args) throws NamingException {
        final Hashtable jndiProperties = new Hashtable();
        jndiProperties.put(Context.INITIAL_CONTEXT_FACTORY, "com.sun.jndi.rmi.registry.RegistryContextFactory");
        jndiProperties.put(Context.PROVIDER_URL, "rmi://localhost:1234");

        InitialContext ctx = new InitialContext(jndiProperties);
        NeoMessage msg = (NeoMessage) ctx.lookup("java:com/neohope/jndi/test01");
        System.out.println(msg.message);
        ctx.close();
    }
}

3、NeoMessage

package com.neohope.jndi.test;

import java.io.Serializable;
import java.rmi.Remote;

/**
 * Created by Hansen
 */
public class NeoMessage implements Remote, Serializable {
    public String message = "";

    public NeoMessage(String message)
    {
        this.message = message;
    }
}

大家可以看出,在这个简单的例子中:
1、服务端仅仅是把数据生成好,放到了LocateRegistry中。
2、而客户端,通过JNDI查到消息,获取到了对应的数据。
3、LocateRegistry完成了跨JVM/主机通讯的任务

反过来思考一下,对于JNDIL是不是更清楚一些了呢?
那再思考一下,那J2EE容器中的数据源是如何统一管理的呢?

JBoss EAP JMS的调用(Queue)

通讯流程图
jms-point-to-point-model.png

首先是Server端的开发及设置:
1、增加一个用户:

bin\add-user.bat

用户名密码随便,但要属于guest组

2、启动Server

standalone.bat -server-config=standalone-full.xml 

3、新建Queue

jboss-cli.bat --connect
jms-queue add --queue-address=jmsQueue --entries=queue/jmsQueue,java:jboss/exported/jms/queue/jmsQueue

到这里服务端已经完成了。

然后是客户端的设置:
1、Sender

package com.neohope.jms.test;

import javax.jms.*;
import javax.naming.Context;
import javax.naming.InitialContext;
import javax.naming.NamingException;
import java.util.Hashtable;

/**
 * Created by Hansen
 */
public class TestQueueSender {
    public static void main(String[] args) throws NamingException, JMSException {

        final Hashtable jndiProperties = new Hashtable();
        jndiProperties.put(Context.INITIAL_CONTEXT_FACTORY, "org.jboss.naming.remote.client.InitialContextFactory");
        jndiProperties.put(Context.PROVIDER_URL, "remote://localhost:4447");
        final InitialContext ctx = new InitialContext(jndiProperties);

        QueueConnectionFactory factory = (QueueConnectionFactory) ctx.lookup("jms/RemoteConnectionFactory");
        QueueConnection connection = factory.createQueueConnection("user001", "user001#");
        QueueSession session = connection.createQueueSession(false, QueueSession.AUTO_ACKNOWLEDGE);

        Queue queue = (Queue) ctx.lookup("jms/queue/jmsQueue");
        TextMessage msg = session.createTextMessage("Queue Test Messagee");
        QueueSender sender = session.createSender(queue);
        sender.send(msg);


        session.close();
        connection.close();
    }
}

2、Receiver

package com.neohope.jms.test;

import javax.jms.*;
import javax.naming.Context;
import javax.naming.InitialContext;
import javax.naming.NamingException;
import java.io.IOException;
import java.util.Hashtable;

/**
 * Created by Hansen
 */
public class TestQueueReceiver {
    public static void main(String[] args) throws NamingException, JMSException, IOException {

        final Hashtable jndiProperties = new Hashtable();
        jndiProperties.put(Context.INITIAL_CONTEXT_FACTORY, "org.jboss.naming.remote.client.InitialContextFactory");
        jndiProperties.put(Context.PROVIDER_URL, "remote://localhost:4447");
        final InitialContext ctx = new InitialContext(jndiProperties);

        QueueConnectionFactory factory = (QueueConnectionFactory) ctx.lookup("jms/RemoteConnectionFactory");
        QueueConnection connection = factory.createQueueConnection("user001", "user001#");
        QueueSession session = connection.createQueueSession(false, QueueSession.AUTO_ACKNOWLEDGE);

        Queue queue = (Queue) ctx.lookup("jms/queue/jmsQueue");
        QueueReceiver receiver = session.createReceiver(queue);
        receiver.setMessageListener(new MessageListener() {
            public void onMessage(Message message) {
                try{
                    TextMessage msg=(TextMessage)message;
                    System.out.println("Queue message received:"+msg.getText());
                }
                catch(JMSException e)
                {
                    System.out.println(e);
                }
            }});

        connection.start();
        System.in.read();

        session.close();
        connection.close();
    }
}

JBoss EAP JMS的调用(Topic)

通讯流程图
jms-publisher-subscriber-model.png

首先是Server端的开发及设置:
1、增加一个用户:

bin\add-user.bat

用户名密码随便,但要属于guest组

2、启动Server

standalone.bat -server-config=standalone-full.xml 

3、新建Topic

jboss-cli.bat --connect
jms-topic add --topic-address=jmsTopic --entries=topic/jmsTopic,java:jboss/exported/jms/topic/jmsTopic

到这里服务端已经完成了。

然后是客户端的设置:
1、Publisher

package com.neohope.jms.test;

import javax.jms.*;
import javax.naming.Context;
import javax.naming.InitialContext;
import javax.naming.NamingException;
import java.util.Hashtable;

/**
 * Created by Hansen
 */
public class TestTopicPublisher {
    public static void main(String[] args) throws NamingException, JMSException {
        final Hashtable jndiProperties = new Hashtable();
        jndiProperties.put(Context.INITIAL_CONTEXT_FACTORY, "org.jboss.naming.remote.client.InitialContextFactory");
        jndiProperties.put(Context.PROVIDER_URL, "remote://localhost:4447");
        final InitialContext ctx = new InitialContext(jndiProperties);


        TopicConnectionFactory factory = (TopicConnectionFactory) ctx.lookup("jms/RemoteConnectionFactory");
        TopicConnection connection = factory.createTopicConnection("user001", "user001#");
        TopicSession session = connection.createTopicSession(false, TopicSession.AUTO_ACKNOWLEDGE);

        Topic topic = (Topic) ctx.lookup("jms/topic/jmsTopic");
        TextMessage msg = session.createTextMessage("Topic Test Message");
        TopicPublisher publisher = session.createPublisher(topic);
        publisher.publish(msg);

        session.close();
        connection.close();
    }
}

2、Subscriber

package com.neohope.jms.test;

import javax.jms.*;
import javax.naming.Context;
import javax.naming.InitialContext;
import javax.naming.NamingException;
import java.io.IOException;
import java.util.Hashtable;

/**
 * Created by Hansen
 */
public class TestTopicSubscriber {
    public static void main(String[] args) throws NamingException, JMSException, IOException {
        final Hashtable jndiProperties = new Hashtable();
        jndiProperties.put(Context.INITIAL_CONTEXT_FACTORY, "org.jboss.naming.remote.client.InitialContextFactory");
        jndiProperties.put(Context.PROVIDER_URL, "remote://localhost:4447");
        final InitialContext ctx = new InitialContext(jndiProperties);


        TopicConnectionFactory factory = (TopicConnectionFactory) ctx.lookup("jms/RemoteConnectionFactory");
        TopicConnection connection = factory.createTopicConnection("user001", "user001#");
        TopicSession session = connection.createTopicSession(false, TopicSession.AUTO_ACKNOWLEDGE);

        Topic topic = (Topic) ctx.lookup("jms/topic/jmsTopic");
        TopicSubscriber subscriber = session.createSubscriber(topic);
        subscriber.setMessageListener(new MessageListener() {
            public void onMessage(Message message) {
                try {
                    TextMessage msg = (TextMessage) message;
                    System.out.println("Topic message received:" + msg.getText());
                } catch (JMSException e) {
                    System.out.println(e);
                }
            }
        });

        connection.start();
        System.in.read();

        session.close();
        connection.close();
    }
}

使用Dubbo实现RPC简单示例02

简单的Dubbo RPC调用描述如下:
dubbo-arch

复杂的Dubbo RPC调用描述如下:
dubbo-arch-ext

在这里我们先用zookeeper来做registry,做一个简单的例子:

一、首先是zookeeper:
1、到zookeeper进行下载
2、解压
3、拷贝conf/zoo_sample.cfg到conf/zoo.cfg,然后按需要修改配置
4、双击bin/zkServer.cmd

二、然后是接口定义,服务端和接口端都会用到,最好打一个jar包,防止错误修改:
IJustATest.java

package com.neohope.dubbo.test;

public interface IJustATest {
    public String SayHelloTo(String name);
    public int Add(int a, int b);
}

三、再就是服务端实现:
1、新建java程序,添加mvn功能,引用dubbo-x.x.x.jar

2、服务实现类MyDubboService.java

package com.neohope.dubbo.test;

public class MyDubboService implements IJustATest{

    public String SayHelloTo(String name) {
        return "Hello " + name;
    }

    public int Add(int a, int b) {
        return a+b;
    }
}

3、服务注册
ServceTest.java

package com.neohope.dubbo.test;

import org.springframework.context.support.ClassPathXmlApplicationContext;

public class ServceTest {
    public static void main(String[] args) throws Exception {
        ClassPathXmlApplicationContext context = new ClassPathXmlApplicationContext(new String[] {"applicationContext.xml"});
        context.start();

        System.in.read();
    }
}

4、spring配置

<?xml version="1.0" encoding="UTF-8"?>

<beans xmlns="http://www.springframework.org/schema/beans"
       xmlns:xsi="http://www.w3.org/2001/XMLSchema-instance"
       xmlns:dubbo="http://code.alibabatech.com/schema/dubbo"
       xsi:schemaLocation="http://www.springframework.org/schema/beans
            http://www.springframework.org/schema/beans/spring-beans.xsd
            http://code.alibabatech.com/schema/dubbo
            http://code.alibabatech.com/schema/dubbo/dubbo.xsd
            ">

    <!-- 具体的实现bean -->
    <bean id="myDubboService" class="com.neohope.dubbo.test.MyDubboService" />

    <!-- 提供方应用信息,用于计算依赖关系 -->
    <dubbo:application name="neo_service_provider"  />

    <!-- 使用zookeeper注册中心暴露服务地址 -->
    <dubbo:registry address="zookeeper://127.0.0.1:2181" />

    <!-- 用dubbo协议在20880端口暴露服务 -->
    <dubbo:protocol name="dubbo" port="20880" />

    <!-- 声明需要暴露的服务接口 -->
    <dubbo:service interface="com.neohope.dubbo.test.IJustATest" ref="myDubboService" />

</beans>

5、编译运行

四、最后是客户端实现:
1、新建java程序,添加mvn功能,引用dubbo-x.x.x.jar

2、服务调用
ServceTest.java

package com.neohope.dubbo.test;

import org.springframework.context.support.ClassPathXmlApplicationContext;

public class ClientTest {
    public static void main(String[] args) throws Exception {
        ClassPathXmlApplicationContext context = new ClassPathXmlApplicationContext(new String[]{"applicationContext.xml"});
        context.start();

        IJustATest proxy = (IJustATest) context.getBean("myDubboService");
        System.out.println(proxy.SayHelloTo("neohope")) ;
        System.out.println(proxy.Add(1,2)) ;

        System.in.read();
    }
}

3、spring配置

<?xml version="1.0" encoding="UTF-8"?>
<beans xmlns="http://www.springframework.org/schema/beans"
       xmlns:xsi="http://www.w3.org/2001/XMLSchema-instance"
       xmlns:dubbo="http://code.alibabatech.com/schema/dubbo"
       xsi:schemaLocation="http://www.springframework.org/schema/beans
            http://www.springframework.org/schema/beans/spring-beans.xsd  
            http://code.alibabatech.com/schema/dubbo  
            http://code.alibabatech.com/schema/dubbo/dubbo.xsd  
            ">

    <!-- 消费方应用名,用于计算依赖关系,不是匹配条件,不要与提供方一样 -->
    <dubbo:application name="neo_service_consumer" />

    <!-- 使用zookeeper注册中心暴露服务地址 -->
    <dubbo:registry address="zookeeper://127.0.0.1:2181" />

    <!-- 生成远程服务代理,可以像使用本地bean一样使用demoService -->
    <dubbo:reference id="myDubboService" interface="com.neohope.dubbo.test.IJustATest" />

</beans>

4、编译运行

使用Dubbo实现RPC简单示例01

由于需要用到dubbo-admin,所以直接下载源码进行编译的

1、到github下载源码
dubbo

2、用mvn生成eclipse工程

mvn eclipse:eclipse

3、导入后,进行编译
如果不是为了看代码方便,直接mvn编译也不错哦

4、将spring版本从2升级到3,我用的是3.2.16.RELEASE
如果考虑到后面的dubbo-admin的话,可以使用citrus-webx-all-3.1.6的相同版本,3.2.7.RELEASE

	<properties>
		<spring_version>3.2.16.RELEASE</spring_version>
	</properties>
	<dependencyManagement>
		<dependencies>
			<dependency>
				<groupId>org.springframework</groupId>
				<artifactId>spring-context</artifactId>
				<version>${spring_version}</version>
			</dependency>
		</dependencies>
	</dependencyManagement>

5、准备将netty3升级到netty4,发现API差距太大,只好后面再搞了哦

6、dubbo-addmin要修改一下依赖

<!--升级citrus-webx-all到3.1.6,但不要升级到3.2.x版本,一堆的错-->
<dependency>
	<groupId>com.alibaba.citrus</groupId>
	<artifactId>citrus-webx-all</artifactId>
	<version>3.1.6</version>
</dependency>

<!--添加依赖包-->
<dependency>
        <groupId>org.apache.velocity</groupId>
        <artifactId>velocity</artifactId>
        <version>1.7</version>
</dependency>

<!--如果你和我一样,用的spring版本与citrus-webx-all不一致,要手工排除一套spring依赖包-->

7、这样就全部编译通过了哦

8、后面准备手工merge一下dubbox的部分代码,可惜他们也没能升级netty4

使用ProtocolBuffer实现RPC简单示例03

接第01部分,本节用来说明Java语言的代码实现。

使用Protoc.exe生成java代码之后,会生成两个java文件,Client与Server都需要包含这两个文件。

首先是Server端:
1、新建一个java项目,引用以下jar包
protobuf-java-3.0.0-beta-2.jar
grpc-all-0.13.1.jar
guava-18.0.jar
netty-all-4.1.0.CR1.jar
okhttp-2.5.0.jar
okio-1.6.0.jar

2、项目中添加生成的两个java文件。

3、新建一个类MyGRPCServer,实现JustATestGrpc.JustATest接口

package com.neohope.protobuf.grpc.test;

import io.grpc.stub.StreamObserver;

public class MyGRPCServer implements JustATestGrpc.JustATest{

    @Override
    public void add(JustATestOuterClass.AddRequest request, StreamObserver<JustATestOuterClass.AddResponse> responseObserver) {
        JustATestOuterClass.AddResponse rsp =  JustATestOuterClass.AddResponse.newBuilder().setC(request.getA() + request.getB()).build();

        responseObserver.onNext(rsp);
        responseObserver.onCompleted();
    }

    @Override
    public void sayHelloTo(JustATestOuterClass.Person request, StreamObserver<JustATestOuterClass.HelloResponse> responseObserver) {
        JustATestOuterClass.HelloResponse rsp =  JustATestOuterClass.HelloResponse.newBuilder().setRsp("Hello "+ request.getName()).build();

        responseObserver.onNext(rsp);
        responseObserver.onCompleted();
    }
}

4、修改TestServer.java

package com.neohope.protobuf.grpc.test;

import io.grpc.Server;
import io.grpc.ServerBuilder;
import io.grpc.netty.NettyServerBuilder;

import java.io.IOException;
import java.util.Scanner;

public class TestServer {
    public static void main(String[] args) throws IOException {
        Server server = NettyServerBuilder.forPort(1900)
                .addService(JustATestGrpc.bindService(new MyGRPCServer()))
                .build()
                .start();

        Scanner scanner =new Scanner(System.in);
        scanner.nextLine();
    }
}

5、编译运行
然后是Client端:
1、新建一个java项目,引用以下jar包
protobuf-java-3.0.0-beta-2.jar
grpc-all-0.13.1.jar
guava-18.0.jar
netty-all-4.1.0.CR1.jar
okhttp-2.5.0.jar
okio-1.6.0.jar

2、项目中添加生成的两个java文件。

3、修改TestClient.java

package com.neohope.protobuf.grpc.test;

import io.grpc.ManagedChannel;
import io.grpc.ManagedChannelBuilder;

public class TestClient {

    public static void main(String[] args)
    {
        ManagedChannel channel = ManagedChannelBuilder.forAddress("localhost", 1900)
                .usePlaintext(true)
                .build();

        JustATestGrpc.JustATestBlockingStub blockingStub = JustATestGrpc.newBlockingStub(channel);

        JustATestOuterClass.AddRequest areq = JustATestOuterClass.AddRequest.newBuilder().setA(1).setB(2).build();
        JustATestOuterClass.AddResponse arsp = blockingStub.add(areq);
        System.out.println(arsp.getC());

        JustATestOuterClass.Person preq = JustATestOuterClass.Person.newBuilder().setAge(30).setName("neohope").setSex(JustATestOuterClass.Person.SexType.MALE).build();
        JustATestOuterClass.HelloResponse prsp = blockingStub.sayHelloTo(preq);
        System.out.println(prsp.getRsp());

        channel.shutdown();
    }
}

4、编译运行

使用ProtocolBuffer实现RPC简单示例02

接第01部分,本节用来说明C#语言的代码实现。

使用Protoc.exe生成cs代码之后,会生成两个cs文件,Client与Server都需要包含这两个文件。

首先是Server端:
1、新建一个Console项目,引用Protoc程序集中以下几个dll文件,并添加生成的CS文件
Google.Protobuf.dll
Grpc.Core.dll
System.Interactive.Async.dll

2、新建一个类MyGRPCServer,实现JustATest.IJustATest接口

using System;
using System.Collections.Generic;
using System.Linq;
using System.Text;
using System.Threading.Tasks;
using Com.Neohope.Protobuf.Grpc.Test;
using Grpc.Core;

namespace TestProtoBufferCliet
{
    class MyGRPCServer : JustATest.IJustATest
    {
        public Task<AddResponse> Add(AddRequest request, ServerCallContext context)
        {
            AddResponse rsp  = new AddResponse();
            rsp.C = request.A + request.B;
            return Task.FromResult(rsp);
        }

        public Task<HelloResponse> SayHelloTo(Person request, ServerCallContext context)
        {
            HelloResponse rsp = new HelloResponse();
            rsp.Rsp = "Hello " + request.Name;
            return Task.FromResult(rsp);
        }
    }
}

3、修改Program.cs

using System;
using System.Collections.Generic;
using System.Linq;
using System.Text;
using Com.Neohope.Protobuf.Grpc.Test;
using Grpc.Core;
using TestProtoBufferCliet;


namespace TestProtoBuffer
{
    class Program
    {
        static void Main(string[] args)
        {
            Server server = new Server
            {
                Services = { JustATest.BindService(new MyGRPCServer()) },
                Ports = { new ServerPort("localhost", 1900, ServerCredentials.Insecure) }
            };
            server.Start();

            
        }
    }
}

4、编译运行
其中,非托管dll要如下放置

.
│  yourprogram.exe
│  
└─nativelibs
    ├─windows_x64
    │      grpc_csharp_ext.dll
    │      
    └─windows_x86
            grpc_csharp_ext.dll
            

然后是Client端:
1、新建一个Console项目,引用Protoc程序集中以下几个dll文件,并添加生成的CS文件
Google.Protobuf.dll
Grpc.Core.dll
System.Interactive.Async.dll

2、修改Program.cs

using System;
using System.Collections.Generic;
using System.Linq;
using System.Text;
using Com.Neohope.Protobuf.Grpc.Test;
using Grpc.Core;

namespace TestProtoBufferCliet
{
    class Program
    {
        static void Main(string[] args)
        {
            Channel channel = new Channel("127.0.0.1:1900", ChannelCredentials.Insecure);
            JustATest.JustATestClient client = JustATest.NewClient(channel);

            Person p = new Person();
            p.Name = "neohope";
            p.Age = 30;
            p.Sex = Person.Types.SexType.MALE;
            HelloResponse prsp = client.SayHelloTo(p);
            Console.WriteLine(prsp.Rsp);

            AddRequest areq = new AddRequest();
            areq.A = 1;
            areq.B = 2;
            AddResponse arsp = client.Add(areq);
            Console.WriteLine(arsp.C);

            channel.ShutdownAsync().Wait();
            Console.ReadLine();
        }
    }
}

3、编译运行
其中,非托管dll要如下放置

.
│  yourprogram.exe
│  
└─nativelibs
    ├─windows_x64
    │      grpc_csharp_ext.dll
    │      
    └─windows_x86
            grpc_csharp_ext.dll