使用ProtocolBuffer实现RPC简单示例01

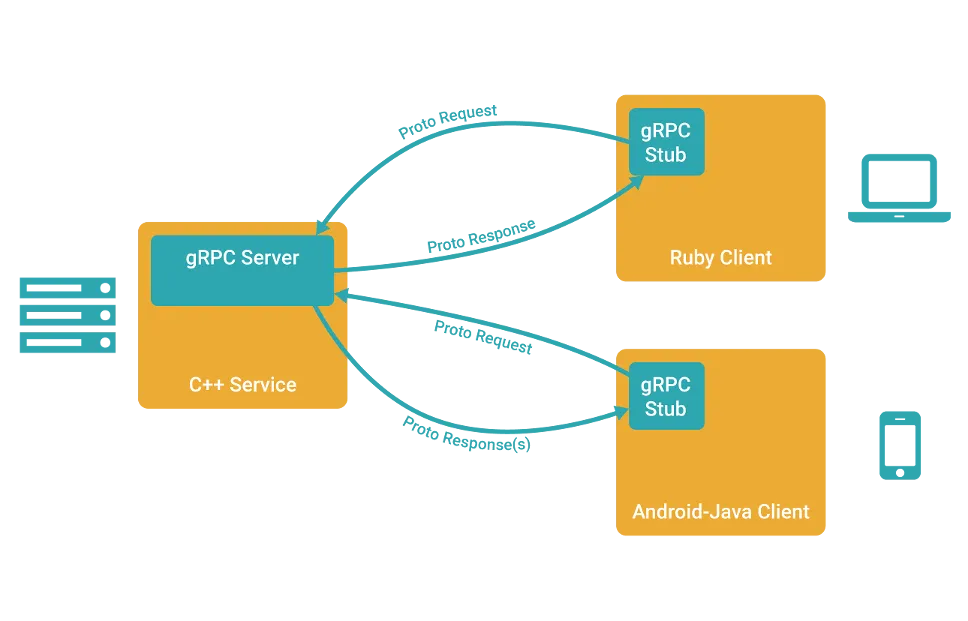
ProtocolBuffer大家多是使用其强大的序列化功能。但从3.0版本起,官方提供了GRPC作为其RPC功能的扩展。同样可以用于跨语言RPC通讯了哦。其通信架构如下图所示:

grpc_concept

使用ProtocolBuffer+GRPC的时候,首先要先下载ProtocolBuffer、GRPC,各种语言的编译工具及语言支持包,本例主要用到C#和Java。

ProtoBuffer的编译工具:
protoc.exe
可以到github下载

Java的工具及支持包,都可以到mvnrepository下载到
protobuf-java-3.0.0-beta-2.jar
grpc-all-0.13.1.jar
guava-18.0.jar
netty-all-4.1.0.CR1.jar
okhttp-2.5.0.jar
okio-1.6.0.jar
protoc-gen-grpc-java.exe(protoc-gen-grpc-java-0.13.1-windows-x86_32.exe 或 protoc-gen-grpc-java-0.13.1-windows-x86_64.exe)

C#的工具及支持包,都可以到NuGet上下载到
Google.Protobuf.dll(测试时NuGet没有3.0版本,我从github下源码,把源码从CS6.0人肉降级到CS5.0,用VS2013把编译通过)
Grpc.Core.dll
grpc_csharp_ext.dll(32及64版本)
System.Interactive.Async.dll
grpc_csharp_plugin.exe

使用新版本ProtocolBuffer+GRPC的时候,先定义一个接口描述文件,比如我自己写了一个很简单的接口。
JustATest.proto

syntax = "proto3";

option java_package = "com.neohope.protobuf.grpc.test";

package com.neohope.protobuf.grpc.test;

service JustATest {
  rpc Add (AddRequest) returns (AddResponse){}
  rpc SayHelloTo (Person) returns (HelloResponse);
}

message Person {
  enum SexType {
    MALE = 0;
    FEMALE = 1;
    OTHER = 2;
    UNKNOWN = 4;
  }
  
  string name = 1;
  SexType sex = 2;
  int32 age = 3;
}

message HelloResponse {
  string rsp = 1;
}

message AddRequest {
  int32 a = 1;
  int32 b = 2;
}

message AddResponse {
  int32 c = 1;
}

然后,工具分别编译为java及c#语言

#CS
protoc.exe --plugin=protoc-gen-grpc=grpc_csharp_plugin.exe --grpc_out gen-cs -I. --csharp_out gen-cs JustATest.proto

#Java
protoc.exe --plugin=protoc-gen-grpc=protoc-gen-grpc-java.exe --grpc_out gen-java -I. --java_out gen-java JustATest.proto

使用Avro实现RPC简单示例03

接第01部分,本节用来说明Java语言的代码实现。

使用avro生成java代码之后,会生成两个java文件,无论是Client还是Server都要包含这两个文件。

首先是Server端:
1、新建一个java项目,引用以下jar包
avro-1.8.0.jar
avro-ipc-1.8.0.jar
jackson-core-asl-1.9.13.jar
jackson-mapper-asl-1.9.13.jar
netty-3.5.13.Final.jar
slf4j-api-1.7.7.jar
slf4j-simple-1.7.7.jar

2、项目中添加生成的两个java文件。

3、新建一个类MyAvroServer,实现JustATest接口

package com.neohope.avro.test;

import org.apache.avro.AvroRemoteException;

public class MyAvroServer implements JustATest{
    @Override
    public CharSequence SayHelloTo(Person person) throws AvroRemoteException {
        return "Hello "+person.getName();
    }

    @Override
    public int Add(int a, int b) throws AvroRemoteException {
        return a+b;
    }
}

4、修改TestServer.java

package com.neohope.avro.test;

import org.apache.avro.ipc.NettyServer;
import org.apache.avro.ipc.specific.SpecificResponder;

import java.net.InetSocketAddress;
import java.util.Scanner;

public class TestServer {
    public static void main(String[] args) {
        NettyServer server = new NettyServer(new SpecificResponder(
                JustATest.class,
                new MyAvroServer()),
                new InetSocketAddress(1900));
        server.start();
        Scanner sc=new Scanner(System.in);
        sc.nextLine();
        server.close();
    }
}

5、编译运行

然后是Client端:
1、新建一个java项目,引用以下jar包
avro-1.8.0.jar
avro-ipc-1.8.0.jar
jackson-core-asl-1.9.13.jar
jackson-mapper-asl-1.9.13.jar
netty-3.5.13.Final.jar
slf4j-api-1.7.7.jar
slf4j-simple-1.7.7.jar

2、项目中添加生成的两个java文件。

3、修改TestClient.java

package com.neohope.avro.test;

import org.apache.avro.AvroRemoteException;
import org.apache.avro.ipc.NettyTransceiver;
import org.apache.avro.ipc.specific.SpecificRequestor;
import org.apache.avro.util.Utf8;

import java.io.IOException;
import java.net.InetSocketAddress;

public class TestClient {
    public static void main(String[] args) throws IOException {
        NettyTransceiver client = new NettyTransceiver(new InetSocketAddress("localhost",1900));

        JustATest proxy = (JustATest) SpecificRequestor.getClient(JustATest.class, client);

        Person person = new Person();
        person.setSex(new Utf8("male"));
        person.setName(new Utf8("neohope"));
        person.setAddress(new Utf8("shanghai"));
        System.out.println(proxy.SayHelloTo(person));
        System.out.println(proxy.Add(1,2));

        client.close();
    }
}

4、编译运行

使用Avro实现RPC简单示例02

接第01部分,本节用来说明C#语言的代码实现。

使用avro生成cs代码之后,会生成三个cs文件,Client与Server需要分别包含这三个文件。

首先是Server端:
1、新建一个Console项目,引用Avro程序集中以下几个dll文件
Avro.dll
Avro.ipc.dll
Castle.Core.dll
log4net.dll
Newtonsoft.Json.dll

2、项目中添加生成的以下几个cs文件
JustATest.cs
Person.cs

3、新建一个类MyAvroServer,实现JustATest接口

using System;
using System.Collections.Generic;
using System.Linq;
using System.Text;
using com.neohope.avro.test;

namespace TestAvro.com.neohope.avro.test
{
    class MyAvroServer : JustATest
    {
        public override string SayHelloTo(Person person)
        {
            return "Hello " + person.name;
        }

        public override int Add(int a, int b)
        {
            return a + b;
        }
    }
}

4、修改Program.cs

using System;
using System.Collections.Generic;
using System.Linq;
using System.Net.Sockets;
using System.Text;
using Avro.ipc;
using Avro.ipc.Specific;
using com.neohope.avro.test;
using TestAvro.com.neohope.avro.test;

namespace TestAvro
{
    class Program
    {
        static void Main(string[] args)
        {
            SpecificResponder<JustATest> responder = new SpecificResponder<JustATest>(new MyAvroServer());
            SocketServer server = new SocketServer("localhost", 1900, responder);
            server.Start();

            Console.ReadLine();

            server.Stop();
        }
    }
}

5、编译运行

然后是Client端:
1、新建一个Console项目,引用Avro程序集中以下几个dll文件
Avro.dll
Avro.ipc.dll
Castle.Core.dll
log4net.dll
Newtonsoft.Json.dll

2、项目中添加生成的以下几个cs文件
JustATestCallback.cs
JustATest.cs
Person.cs

3、修改Program.cs

using System;
using System.Collections.Generic;
using System.Linq;
using System.Text;
using Avro.ipc;
using Avro.ipc.Specific;
using com.neohope.avro.test;

namespace TestAvroClient
{
    class Program
    {
        static void Main(string[] args)
        {
            SocketTransceiver transceiver = new SocketTransceiver("localhost", 1900);
            JustATestCallback proxy = SpecificRequestor.CreateClient<JustATestCallback>(transceiver);
            
            Person person = new Person();
            person.sex = "male";
            person.name = "neohope";
            person.address = "shanghai";
            Console.WriteLine(proxy.SayHelloTo(person));
            Console.WriteLine(proxy.Add(1, 2));

            transceiver.Close();
        }
    }
}

4、编译运行

使用Avro实现RPC简单示例01

Avro也是典型CS架构,与ICE、CORBA、Thrift相同,但大家一般不太用其做RPC框架,而多是使用其强大的序列化功能。即使如此,我们也可以将Avro用于RPC通讯,也只需要告诉Avro服务在哪里,需要哪个服务,调用参数是什么,然后就坐等处理结果就好咯。

使用Avro的时候,首先要先下载Avro的开发包,每种序言需要单独下载,都自带编译工具及语言支持包,本例主要用到C#和Java。
Avro

使用新版本Avro的时候,一般显示用IDL语言,定义一个接口描述文件,比如我自己写了一个很简单的接口。
JustATest.avdl

@namespace("com.neohope.avro.test")
protocol JustATest{
  record Person {
    string name;
    int age;
    string sex;
    string address;
  }

  string SayHelloTo(Person person);
  int Add(int a,int b);
}

然后用Avro自带工具,将其翻译为protocol文件
JustATest.avpr

set AVRO_HOME=D:\Build\Avro\avro-java-1.8.0
java -jar %AVRO_HOME%\avro-tools-1.8.0.jar idl JustATest.avdl JustATest.avpr

翻译得到的JustATest.avpr文件如下:

{
  "protocol" : "JustATest",
  "namespace" : "com.neohope.avro.test",
  "types" : [ {
    "type" : "record",
    "name" : "Person",
    "fields" : [ {
      "name" : "name",
      "type" : "string"
    }, {
      "name" : "age",
      "type" : "int"
    }, {
      "name" : "sex",
      "type" : "string"
    }, {
      "name" : "address",
      "type" : "string"
    } ]
  } ],
  "messages" : {
    "SayHelloTo" : {
      "request" : [ {
        "name" : "person",
        "type" : "Person"
      } ],
      "response" : "string"
    },
    "Add" : {
      "request" : [ {
        "name" : "a",
        "type" : "int"
      }, {
        "name" : "b",
        "type" : "int"
      } ],
      "response" : "int"
    }
  }
}

然后,用工具分别编译为java及c#语言

#java
set AVRO_HOME=D:\Build\Avro\avro-java-1.8.0
java -jar %AVRO_HOME%\avro-tools-1.8.0.jar compile protocol JustATest.avpr avpr

#c#
avrogen -p JustATest.avpr avpr-cs

使用Thrift实现RPC简单示例03

接第01部分,本节用来说明Java语言的代码实现。

使用thrift生成java代码之后,会生成两个java文件,无论是Client还是Server都要包含这个文件。

首先是Server端:
1、新建一个java项目,引用libthrift.jar,项目中添加生成的两个java文件。
2、新建一个类MyThriftServer,实现JustATest.Iface接口

package com.neohope.thrift.test;

import org.apache.thrift.TException;

public class MyThriftServer implements JustATest.Iface {
    @Override
    public String SayHelloTo(Person person) throws TException {
        return "Hello "+ person.getName();
    }

    @Override
    public int Add(int a, int b) throws TException {
        return a+b;
    }
}

3、修改TestServer.java

package com.neohope.thrift.test;

import org.apache.thrift.protocol.TBinaryProtocol;
import org.apache.thrift.server.TServer;
import org.apache.thrift.server.TThreadPoolServer;
import org.apache.thrift.transport.TServerSocket;
import org.apache.thrift.transport.TTransportException;

public class TestServer {
    public static void main(String[] args) {
        try {
            TServerSocket serverTransport = new TServerSocket(1900);
            JustATest.Processor process = new JustATest.Processor(new MyThriftServer());
            TBinaryProtocol.Factory portFactory = new TBinaryProtocol.Factory(true, true);
            TThreadPoolServer.Args thriftArgs = new TThreadPoolServer.Args(serverTransport);
            thriftArgs.processor(process);
            thriftArgs.protocolFactory(portFactory);
            TServer server = new TThreadPoolServer(thriftArgs);
            server.serve();
        } catch (TTransportException e) {
            e.printStackTrace();
        }
    }
}

4、编译运行

然后是Client端:
1、新建一个java项目,引用libthrift.jar,项目中添加生成的两个java文件。
2、修改TestClient.java

package com.neohope.thrift.test;

import org.apache.thrift.TException;
import org.apache.thrift.protocol.TBinaryProtocol;
import org.apache.thrift.protocol.TProtocol;
import org.apache.thrift.transport.TSocket;
import org.apache.thrift.transport.TTransport;
import org.apache.thrift.transport.TTransportException;

public class TestClient {

    public static void main(String[] args) {
        TTransport transport;
        try {
            transport = new TSocket("localhost", 1900);
            TProtocol protocol = new TBinaryProtocol(transport);
            JustATest.Client client = new JustATest.Client(protocol);
            transport.open();

            Person p = new Person();
            p.setName("neohope");
            System.out.println(client.SayHelloTo(p));
            System.out.println(client.Add(1, 2));
            transport.close();
        } catch (TTransportException e) {
            e.printStackTrace();
        } catch (TException e) {
            e.printStackTrace();
        }
    }
}

3、编译运行

使用Thrift实现RPC简单示例02

接第01部分,本节用来说明C#语言的代码实现。

使用thrift生成cs代码之后,会生成两个cs文件,无论是Client还是Server都要包含这个文件。

首先是Server端:
1、新建一个Console项目,引用Thrift程序集中的Thrift.dll,项目中添加生成的两个cs文件。
2、新建一个类MyThriftServer,实现JustATest.Iface接口

using System;
using System.Collections.Generic;
using System.Linq;
using System.Text;

namespace TestThrift
{
    class MyThriftServer : JustATest.Iface
    {
        public string SayHelloTo(Person person)
        {
            return "Hello " + person.Name;
        }

        public int Add(int a, int b)
        {
            return a + b;
        }
    }
}

3、修改Program.cs

using System;
using System.Collections.Generic;
using System.Linq;
using System.Text;
using Thrift.Protocol;
using Thrift.Server;
using Thrift.Transport;

namespace TestThrift
{
    class Program
    {
        static void Main(string[] args)
        {
            TServerSocket serverTransport = new TServerSocket(1900, 0, false);
            JustATest.Processor processor = new JustATest.Processor(new MyThriftServer());
            TServer server = new TSimpleServer(processor, serverTransport);
            server.Serve(); 
        }
    }
}

4、编译运行

然后是Client端:
1、新建一个Console项目,引用Thrift程序集中的Thrift.dll,项目中添加生成的两个cs文件。
2、修改Program.cs

using System;
using System.Collections.Generic;
using System.Linq;
using System.Text;
using Thrift.Protocol;
using Thrift.Transport;

namespace TestThriftClient
{
    class Program
    {
        static void Main(string[] args)
        {
            TTransport transport = new TSocket("localhost", 1900); 
            TProtocol protocol = new TBinaryProtocol(transport);
            JustATest.Client client = new JustATest.Client(protocol); 
            transport.Open(); 
 
            Person p = new Person();
            p.Name="neohope";
            Console.WriteLine(client.SayHelloTo(p));
            Console.WriteLine(client.Add(1, 2));
            
            transport.Close();
        }
    }
}

3、编译运行

使用Thrift实现RPC简单示例01

看一眼下面的框架,你就会发现,Thrift框架其实与CORBA、ICE很相似。对使用者来说,最大的不同,估计是Thrift用一个可执行文件,生成各种各样的代码咯(别告诉我你信了)。

Thrift Arch

Thrift是典型CS架构,与ICE、CORBA相同,Thrift帮我们处理的底层的网络通信及服务定位,我们只需要告诉Thrift服务在哪里,需要哪个服务,调用参数是什么,然后就坐等处理结果就好咯。

使用Thrift的时候,首先要先下载Thrift的开发包,分两部分。
Thrift
一个是一个EXE文件,适用于从IDL描述文件,生成各类语言代码的。
第二个是源码压缩包,用于编译自己所需语言的支持包。

受用Thrift之前,要先编译需要的语言支持包,我这里用到了C#和Java。
Java包,直接到路径lib/java下,执行ant命令就好了
C#包,直接到路径lib/csharp/src下,用VS编译Thrift.sln就好了

使用Thrift的时候,首先要用IDL语言,定义一个接口描述文件,比如我自己写了一个很简单的接口。
JustATest.thrift

struct Person {
1: string name
2: i32 age
3: string sex
4: string address
}

service JustATest {
  string SayHelloTo(1:Person person);
  i32 Add(1:i32 a,2:i32 b);
}

然后用语言的转化工具,将接口描述文件,转化为对应语言。

#生成java代码,会有两个文件
thrift -gen java JustATest.thrift

#生成C#代码,会有两个文件
thrift -gen csharp JustATest.thrift

在对应的项目中包含这些文件及所需要的库文件(jar、dll),就可以开工了。

使用ICE实现RPC简单示例03

接第01部分,本节用来说明Java语言的代码实现。

使用slice2java之后,会生成10个文件,Client与Server需要分别包含多个文件。

首先是Server端:
1、新建一个java项目,引用ice-3.6.1.jar
2、copy以下几个文件
_iIceTestDisp.java
_iIceTestOperations.java
_iIceTestOperationsNC.java
iIceTest.java
iIceTestHolder.java
3、新建一个类MyICETest,实现iIceTestDisp_接口

package com.neohope.ice.test;

import Ice.Current;

public class MyIceTest extends _iIceTestDisp {
    @Override
    public String SayHelloTo(String s, Current __current) {
        return "Hello " + s;
    }

    @Override
    public int Add(int a, int b, Current __current) {
        return a+b;
    }
}

4、新建测试类TestServer

package com.neohope.ice.test;

public class TestServer {

    public static void main(String[] args) {
        Ice.Communicator ic = null;

        //初使化
        ic = Ice.Util.initialize(args);

        //创建适配器,并指定监听端口
        Ice.ObjectAdapter adapter = ic.createObjectAdapterWithEndpoints("NeoTestAdapter", "default -p 1900");

        //绑定
        Ice.Object obj = new MyIceTest();
        adapter.add(obj, Ice.Util.stringToIdentity("NeoICETest"));

        //激活适配器
        adapter.activate();

        //持续监听,直到服务关闭
        ic.waitForShutdown();

        //清理
        if (ic != null) {
            try {
                ic.destroy();
            } catch (Exception e) {
                System.err.println(e.getMessage());
            }
        }
    }
}

5、编译运行

然后是Client端:
1、新建一个java项目,引用ice-3.6.1.jar
2、copy以下几个文件
Callback_iIceTest_Add.java
Callback_iIceTest_SayHelloTo.java
iIceTestPrx.java
iIceTestPrxHelper.java
iIceTestPrxHolder.java
3、新建测试类TestClient

package com.neohope.ice.test;

public class TestClient {
    public static void main(String[] args) {
        Ice.Communicator ic = null;

        //初使化
        ic = Ice.Util.initialize(args);
        Ice.ObjectPrx obj = ic.stringToProxy("NeoICETest:default -p 1900");

        //查找并获取代理接口
        iIceTestPrx client = iIceTestPrxHelper.checkedCast(obj);
        if (client == null) throw new Error("Invalid proxy");

        //调用服务端方法
        System.out.println(client.SayHelloTo("neohope"));
        System.out.println(client.Add(1, 2));

        //清理
        if (ic != null) {
            try {
                ic.destroy();
            } catch (Exception e) {
                System.err.println(e.getMessage());
            }
        }
    }
}

4、编译运行

PS:
1、不要乱修改id,如果要修改,必须全部修改
2、我调整了包名,不调整也可以

使用ICE实现RPC简单示例02

接第01部分,本节用来说明C#语言的代码实现。

使用slice2cs之后,会生成一个文件JustATest.cs,无论是Client还是Server都要包含这个文件。

首先是Server端:
1、新建一个Console项目,引用ICE程序集中的Ice.dll,项目中添加JustATest.cs文件。
2、新建一个类MyICETest,实现iIceTestDisp_接口

using System;
using System.Collections.Generic;
using System.Linq;
using System.Text;
using Ice;
using com.neohope.ice.test;

namespace TestICEServer
{
    class MyICETest : iIceTestDisp_
    {
        public override string SayHelloTo(string s, Current current__)
        {
            return "Hello " + s;
        }

        public override int Add(int a, int b, Current current__)
        {
            return a + b;
        }
    }
}

3、修改Program.cs

using System;
using System.Collections.Generic;
using System.Linq;
using System.Text;

namespace TestICEServer
{
    class Program
    {
        static void Main(string[] args)
        {
            Ice.Communicator ic = null;

            //初使化
            ic = Ice.Util.initialize(ref args);

            //创建适配器,并指定监听端口
            Ice.ObjectAdapter adapter = ic.createObjectAdapterWithEndpoints("NeoTestAdapter", "default -p 1900");

            //绑定
            Ice.Object obj = new MyICETest();
            adapter.add(obj,Ice.Util.stringToIdentity("NeoICETest"));

            //激活适配器
            adapter.activate();

            //持续监听,直到服务关闭
            ic.waitForShutdown();

            //清理
            if (ic != null)
            {
                try
                {
                    ic.destroy();
                }
                catch (Exception e)
                {
                }
            }
        }
    }
}

4、编译运行

然后是Client端:
1、新建一个Console项目,引用ICE程序集中的Ice.dll,项目中添加JustATest.cs文件。
2、修改Program.cs

using System;
using System.Collections.Generic;
using System.Linq;
using System.Text;

using com.neohope.ice.test;
//using JustATest;

namespace TestICE
{
    class Program
    {
        static void Main(string[] args)
        {
            Ice.Communicator ic = null;

            try
            {
                //初使化 
                ic = Ice.Util.initialize(ref args);
                Ice.ObjectPrx obj = ic.stringToProxy("NeoICETest:default -p 1900");

                //查找并获取代理接口
                iIceTestPrx client = iIceTestPrxHelper.checkedCast(obj);
                if (client == null)
                {
                    throw new ApplicationException("Invalid proxy");
                }

                //调用服务端方法
                Console.WriteLine(client.SayHelloTo("neohope"));
                Console.WriteLine(client.Add(1, 2));
            }
            catch (Exception ex)
            {
                Console.WriteLine(ex.Message);
            }
            finally
            {
                //清理
                if (ic != null)
                {
                    try
                    {
                        ic.destroy();
                    }
                    catch (Exception e)
                    {
                        Console.Error.WriteLine(e);
                    }
                }
            }
        }
    }
}

3、编译运行

PS:
1、不要乱修改id,如果要修改,必须全部修改
2、我调整了包名,不调整也可以

使用ICE实现RPC简单示例01

看一眼下面的框架,你就会发现,ICE框架其实与CORBA很相似。但ICE更加的简洁高效,并增加了很多现代框架的特性。同时,其开发组件更加易用,不需每种语言单独下载,学习成本相对较低。

Ice_Client_and_Server_Structure

ICE是典型CS架构,与CORBA相同,ICE帮我们处理的底层的网络通信及服务定位,我们只需要告诉ICE服务在哪里,需要哪个服务,调用参数是什么,然后就坐等处理结果就好咯。

使用ICE的时候,首先要先下载ICE的开发包,下载后直接解压就好了。
ICE下载地址

在使用ICE的时候,首先要用Slice语言,定义一个接口描述文件,比如我自己写了一个很简单的接口。
JustATest.ice

module JustATest
{ 
  interface iIceTest
  { 
    string SayHelloTo(string s);
    int Add(int a, int b);
  }; 
};

然后用对应语言的转化工具,将接口描述文件,转化为对应语言。

#设置环境变量
set ICE_HOME=C:\NeoArch\ZeroC\Ice-3.6.1
set PATH=%ICE_HOME%\bin;%PATH%

#转化为java
slice2java JustATest.ice

#转化为csharp
slice2cs JustATest.ice

那ICE的Client端,是如何找到Server,并告诉Server要调用哪个服务的呢?

//首先,Server在启动的时候,要指定Adapter的名称与端口
ic.createObjectAdapterWithEndpoints("NeoTestAdapter", "default -p 1900");
//然后,在Server端的Adapter上,要做一个类似于将服务名称与服务对象绑定的动作
adapter.add(obj,Ice.Util.stringToIdentity("NeoICETest"));

//当Client启动的时候,要指定端口及服务名称,这样就找到了
Ice.ObjectPrx obj = ic.stringToProxy("NeoICETest:default -p 1900");

那如果两个服务同名,只是端口不一致咋办呢?
你可以发现,无论是Client还是Server,无论是C#还是Java,都有类似的代码,你懂的。

        //C#
        public static readonly string[] ids__ =
        {
            "::Ice::Object",
            "::JustATest::iIceTest"
        };
    //java
    public static final String[] __ids =
    {
        "::Ice::Object",
        "::JustATest::iIceTest"
    };

在client段调用的时候,有checkedCast和uncheckedCast两种转换方式,说白了,checkedCast会先校验接口是否匹配,而uncheckedCast会直接强制转换不做任何校验。可以根据实际情况选用咯。