信息安全法规汇总(通用)
整理资料的时候,发现之前汇总过的一些安全法规,汇总时间大概在24年中:
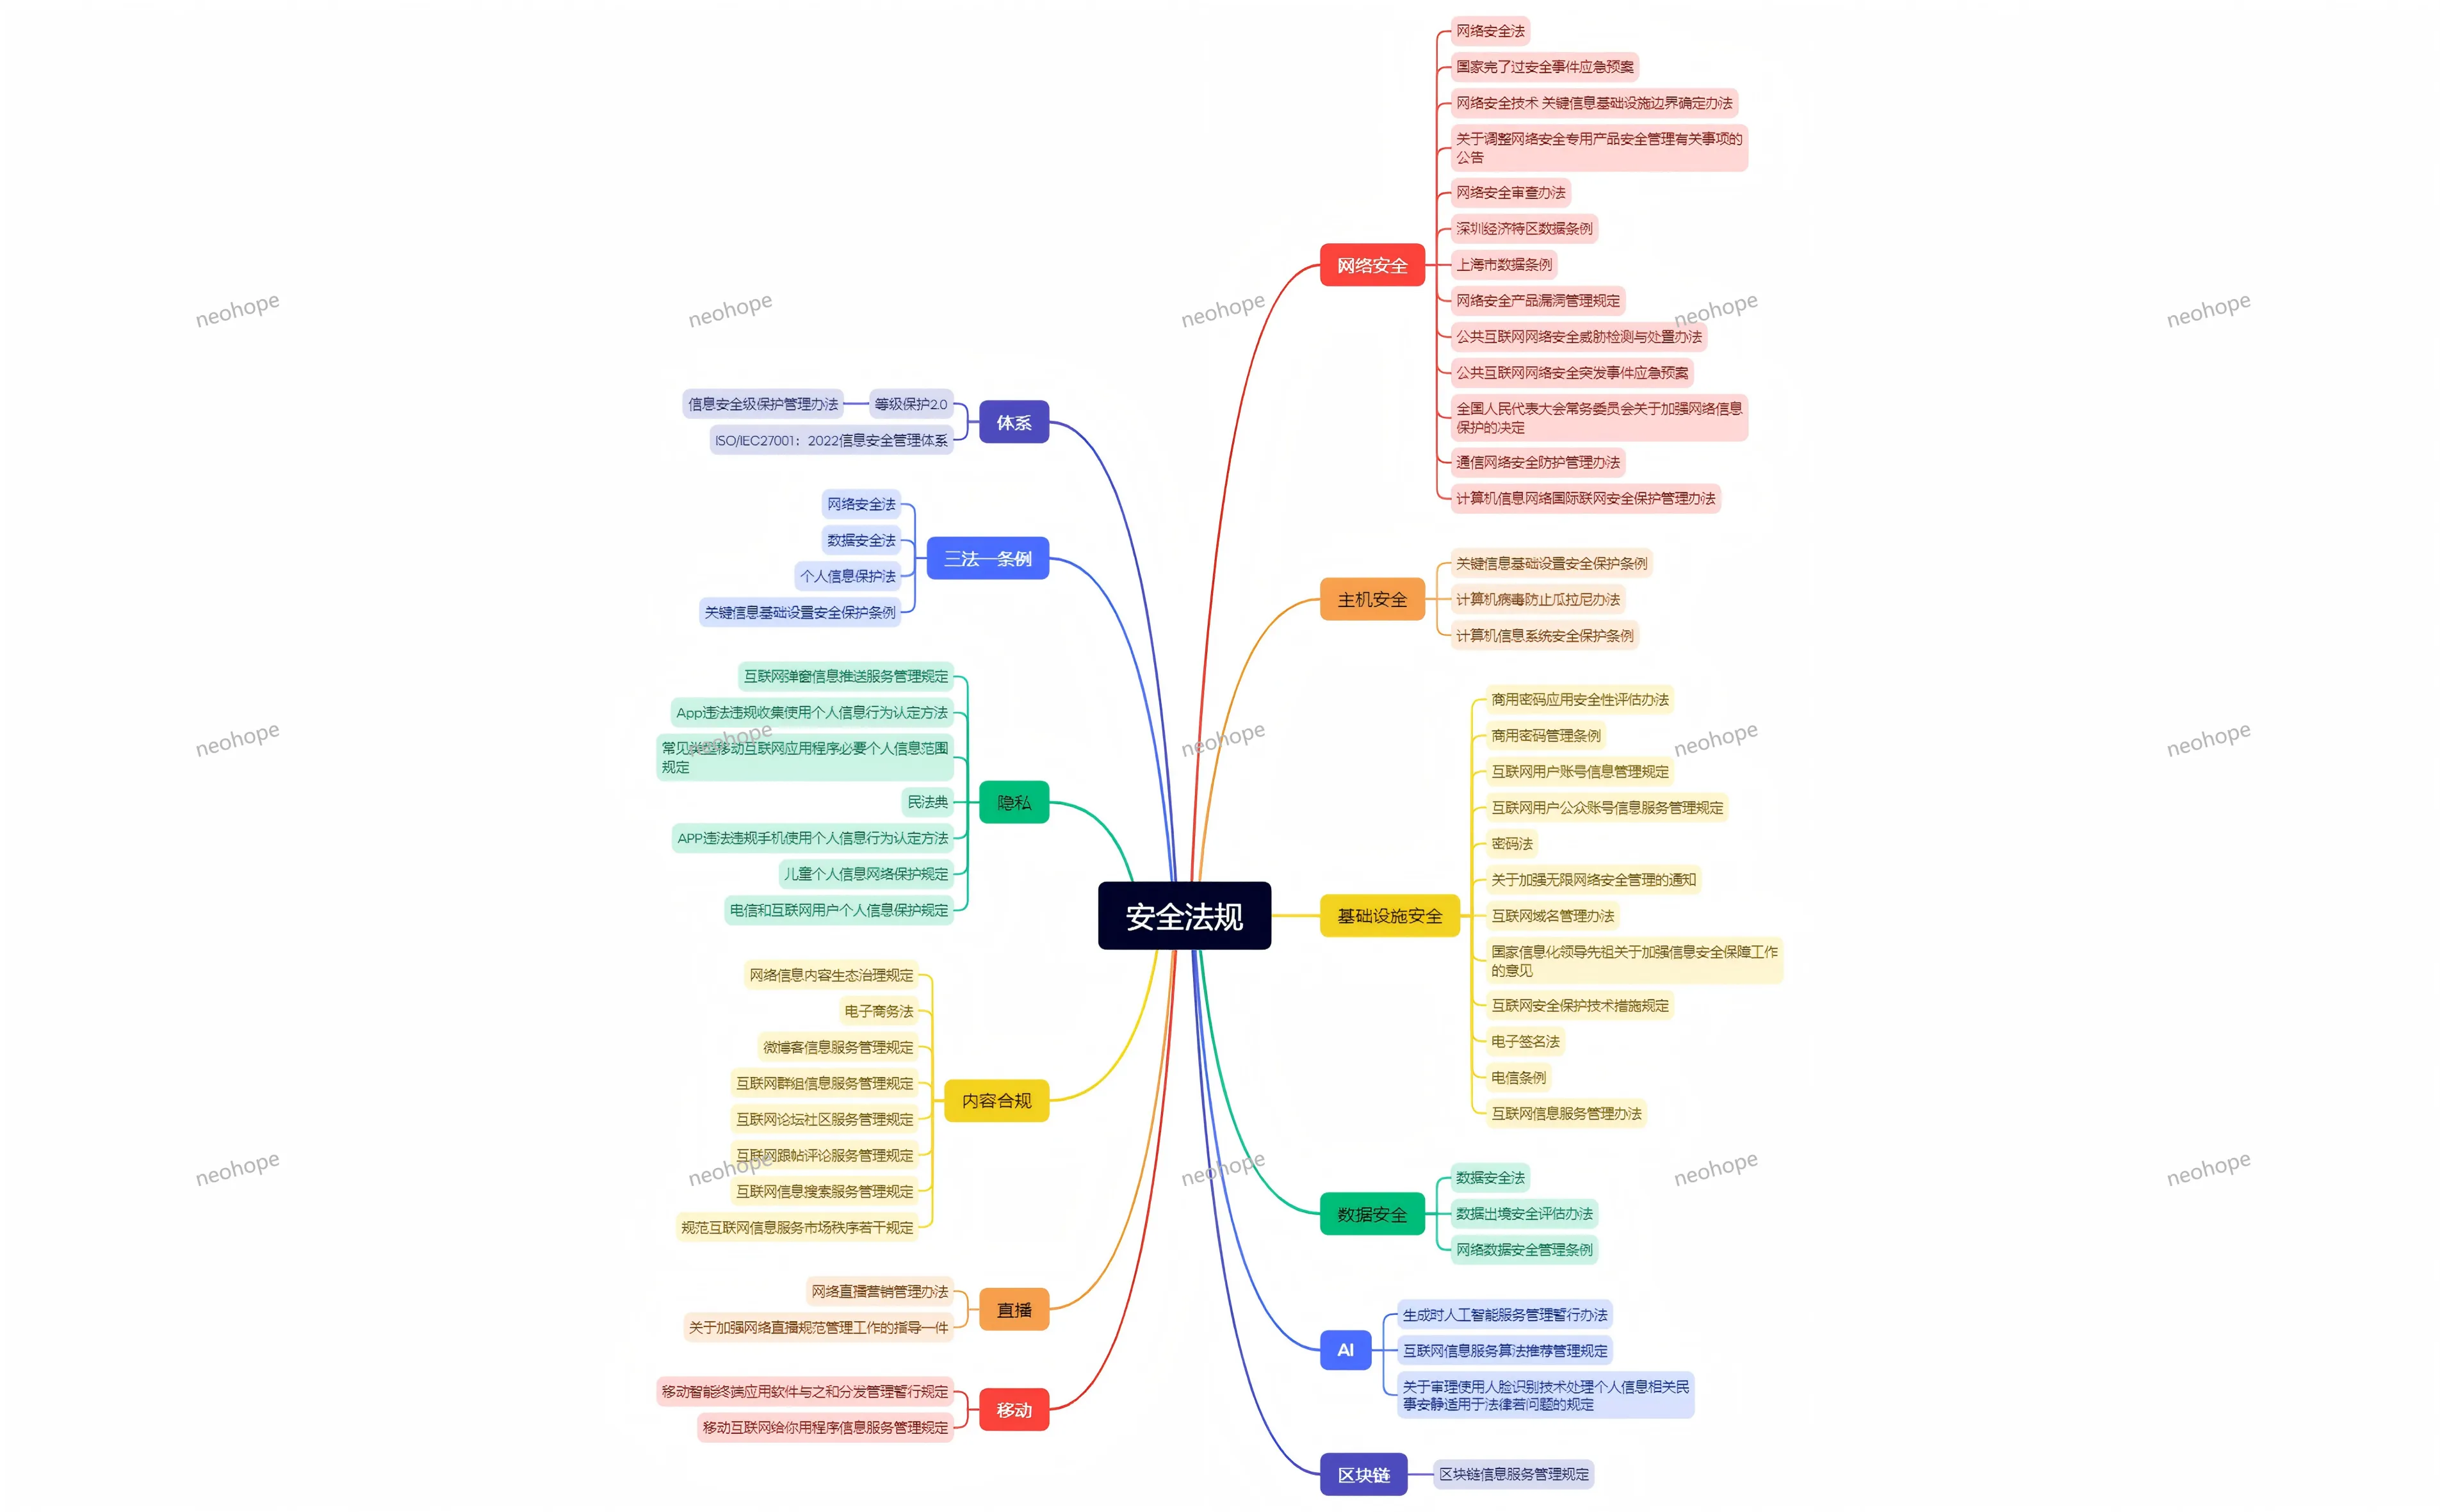
一、安全法规体系
1. 等级保护 2.0 & 《信息安全等级保护管理办法》
《信息安全等级保护管理办法》由公安部等四部门 2007 年联合发布,是等级保护制度的核心规章;2019 年配套标准全面更新,正式进入等级保护 2.0阶段,已被《网络安全法》明确为法定强制制度。
- 核心内容:将网络与信息系统按重要程度分为五级,覆盖云计算、大数据、物联网、工业控制、移动互联五大新场景;要求网络运营者完成定级、备案、建设整改、等级测评、监督检查全流程合规,是我国网络安全的基础合规底座。
2. ISO/IEC 27001:2022 信息安全管理体系
国际标准化组织(ISO/IEC)发布的全球通用信息安全管理体系(ISMS)标准,2022 版完成重大更新。
- 核心内容:从原 14 个控制域调整为 4 大主题 20 个控制域,新增威胁情报、数据脱敏、AI 安全等前沿控制项;属于自愿性认证标准,帮助企业建立全流程、可落地的信息安全管理体系,是全球信息安全领域认可度最高的合规框架。
二、三法一条例
我国网络安全与数据安全的顶层法律框架,构成监管核心依据。
1. 《中华人民共和国网络安全法》
2016 年通过、2017 年施行,2025 年修正、2026 年 1 月施行新法,是我国网络安全领域基础性法律。
- 核心内容:确立网络空间主权、网络安全等级保护、关键信息基础设施保护、网络信息安全、监测预警与应急处置等核心制度,明确网络运营者的法定安全义务,划定网络安全违法的法律责任边界。
2. 《中华人民共和国数据安全法》
2021 年 9 月 1 日施行,我国数据安全领域基础性法律。
- 核心内容:确立数据分类分级保护、数据安全审查、风险评估、应急处置、数据出口管制等核心制度,覆盖数据全生命周期安全管理,明确重要数据的特殊保护要求,统筹数据安全与数据开发利用。
3. 《中华人民共和国个人信息保护法》
2021 年 11 月 1 日施行,我国个人信息保护领域专门法律。
- 核心内容:确立 “告知 – 同意”“最小必要”“目的限定” 等处理原则,明确敏感个人信息特殊保护、个人信息跨境传输规则、个人信息主体权利,设置高额罚则,全面规范个人信息处理活动。
4. 《关键信息基础设施安全保护条例》
2021 年 9 月 1 日施行,国务院发布,是《网络安全法》的核心配套行政法规。
- 核心内容:明确关键信息基础设施(关基)的认定规则、运营者的专项安全保护义务、监测预警与应急处置机制,重点保护公共通信、能源、交通、水利、金融等重要行业领域的信息基础设施。
三、隐私合规
注:大纲中重复的《App 违法违规收集使用个人信息行为认定方法》已合并说明。
1. 《互联网弹窗信息推送服务管理规定》
2022 年 9 月施行,国家网信办等部门发布。
- 核心内容:规范弹窗广告、推送信息行为,要求弹窗必须设置显著关闭按钮、不得诱导点击、不得强制推送,限制弹窗频次与展示场景,保护用户知情权与选择权。
2. 《App 违法违规收集使用个人信息行为认定方法》
2019 年由网信办等四部门联合发布。
- 核心内容:明确 6 大类 31 项违法违规行为的执法认定标准,包括未经同意收集、超范围收集、强制授权、频繁索权、违规共享转让等,是 App 隐私合规监管执法的直接判定依据。
3. 《常见类型移动互联网应用程序必要个人信息范围规定》
2021 年 5 月施行。
- 核心内容:明确 39 类常见 App 的必要个人信息边界,划定 “最小必要” 的收集范围;规定 App 不得因用户拒绝提供非必要信息,而拒绝向用户提供核心服务功能。
4. 《中华人民共和国民法典》
2021 年 1 月 1 日施行,人格权编设 “隐私权和个人信息保护” 专章。
- 核心内容:从民事法律层面定义隐私权与个人信息,确立个人信息处理的基本规则,明确个人信息权益的侵权责任与救济路径,是个人信息保护的民事法律基础。
5. 《儿童个人信息网络保护规定》
2019 年 10 月施行,我国首部儿童个人信息保护专门规章。
- 核心内容:针对不满 14 周岁儿童个人信息,要求处理前必须取得监护人明示同意,设置专门的信息保护规则、安全保障措施与监督管理要求。
6. 《电信和互联网用户个人信息保护规定》
2013 年 9 月施行,工信部发布。
- 核心内容:规范电信业务经营者、互联网信息服务提供者的用户个人信息收集、使用行为,明确信息安全保障义务与用户查询、更正、删除等权利,是电信互联网领域隐私保护的基础规章。
四、内容合规
1. 《网络信息内容生态治理规定》
2020 年 3 月施行,我国首部网络生态治理专门规章。
- 核心内容:将网络信息分为正能量内容、违法内容、不良内容三类,明确平台、内容生产者、普通用户的主体责任,构建网络生态综合治理体系,治理网络乱象。
2. 《中华人民共和国电子商务法》
2019 年 1 月 1 日施行。
- 核心内容:规范电子商务经营活动,明确电商平台的内容审核、知识产权保护、消费者权益保护义务,规制大数据杀熟、虚假宣传、刷单炒信等行为,覆盖电商领域经营与内容双重合规。
3. 《微博客信息服务管理规定》
2018 年 3 月施行。
- 核心内容:规范微博等短内容平台的信息服务,要求平台落实真实身份认证、内容审核、违法信息处置义务,规范账号运营与信息发布行为。
4. 《互联网群组信息服务管理规定》
2017 年 10 月施行。
- 核心内容:确立 “谁建群谁负责、谁管理谁负责” 原则,明确群组建立者、管理者的管理责任,要求平台落实群组审核、内容巡查等管理义务,覆盖微信群、QQ 群等各类互联网群组。
5. 《互联网论坛社区服务管理规定》
2017 年 10 月施行。
- 核心内容:规范论坛、贴吧、社区类服务,要求平台落实用户真实身份认证、内容审核、版块管理责任,规范用户发言与社区运营。
6. 《互联网跟帖评论服务管理规定》
2017 年发布、2022 年修订。
- 核心内容:规范新闻、论坛等平台的跟帖评论服务,要求落实 “先审后发”、真实身份认证,禁止发布违法违规评论,明确平台的审核与管理责任。
7. 《互联网信息搜索服务管理规定》
2016 年 8 月施行。
- 核心内容:规范搜索引擎服务,要求显著区分自然搜索结果与商业推广信息,禁止提供违法违规信息搜索服务,落实搜索结果审核与信息安全管理义务。
8. 《规范互联网信息服务市场秩序若干规定》
2012 年 3 月施行,工信部发布。
- 核心内容:规制互联网领域不正当竞争行为,禁止恶意干扰用户终端、欺骗误导用户、滥用市场支配地位等行为,维护互联网信息服务市场公平竞争秩序。
五、直播合规
1. 《网络直播营销管理办法(试行)》
2021 年 5 月施行,七部门联合发布。
- 核心内容:针对直播电商场景,明确直播营销平台、直播间运营者、直播营销人员的权责划分,规范直播选品、宣传、交易全流程,落实内容审核、商品合规、消费者保护要求。
2. 《关于加强网络直播规范管理工作的指导意见》
2021 年 2 月发布,七部门联合印发。
- 核心内容:覆盖秀场直播、电商直播等全品类,从内容发布、账号管理、平台责任、行业自律等维度提出全链条规范要求,重点治理低俗内容、打赏失范、虚假宣传等行业乱象。
六、移动应用合规
1. 《移动智能终端应用软件预置和分发管理暂行规定》
2017 年 7 月施行,工信部发布。
- 核心内容:规范手机等智能终端的 App 预置行为,要求除基础功能外的预置 App 必须支持用户卸载,禁止擅自预置恶意程序与推广类应用;同时规范应用分发平台的审核管理义务。
2. 《移动互联网应用程序信息服务管理规定》
2016 年发布、2022 年修订施行,网信办发布。
- 核心内容:规范 App 信息服务全流程,要求 App 提供者落实主体责任、履行备案手续,加强内容审核与个人信息保护,明确应用分发平台的上架审核、动态管理义务。
七、网络安全专项
注:《网络安全法》已在 “三法一条例” 章节介绍,此处不再重复。
-
《国家网络安全事件应急预案》:2017 年发布,将网络安全事件分为四级,明确全国统一的应急组织体系、分级响应流程与保障机制,统筹网络安全事件应急处置。
-
《网络安全技术 关键信息基础设施边界确定方法》(GB/T 41681-2022):国家标准,明确关基边界的划定原则、方法与流程,为关基认定、安全防护范围界定提供技术依据。
-
《关于调整网络安全专用产品安全管理有关事项的公告》:2023 年发布,优化网络安全专用产品的安全认证与检测机制,统一认证标准与产品目录,简化市场准入管理。
-
《网络安全审查办法》:2022 年修订施行,针对关基运营者采购网络产品服务、数据处理者开展数据活动等场景开展安全审查,重点防范供应链安全、数据安全等国家安全风险。
-
地方数据条例:《深圳经济特区数据条例》(2022 年 7 月)、《上海市数据条例》(2022 年 1 月),地方层面细化数据权益、公共数据开放、数据要素市场化、个人信息保护规则,结合区域特点落地数据安全与发展要求。
-
《网络产品安全漏洞管理规定》:2021 年 9 月施行,规范漏洞发现、报告、修补、发布全流程;明确产品提供者的漏洞修复义务,禁止恶意利用、非法售卖漏洞信息,由网信、工信、公安三部门协同监管。
-
《公共互联网网络安全威胁监测与处置办法》:2018 年 1 月施行,工信部发布,建立公共互联网安全威胁监测预警与处置机制,明确基础电信企业、域名机构的监测处置责任。
-
《公共互联网网络安全突发事件应急预案》:工信部发布,针对公共互联网安全突发事件分级分类,明确应急响应流程与处置措施,保障公共互联网稳定运行。
-
《全国人民代表大会常务委员会关于加强网络信息保护的决定》:2012 年发布,我国首部网络信息保护专项立法文件,确立个人信息保护、垃圾信息治理、网络身份管理等基础规则,为后续网络立法奠定框架。
-
《通信网络安全防护管理办法》:2010 年 3 月施行,工信部发布,要求通信网络运营单位落实分级防护、风险评估、安全检测义务,保障通信网络安全稳定。
-
《计算机信息网络国际联网安全保护管理办法》:1997 年发布、2011 年修订,公安部发布,规范国际联网安全保护,明确联网单位与用户的安全责任,禁止利用国际联网从事违法犯罪活动。
八、主机安全
注:《关键信息基础设施安全保护条例》已在前文介绍,此处补充剩余两项。
-
《计算机病毒防治管理办法》:2000 年公安部发布,规范计算机病毒防治管理,禁止制作、传播计算机病毒,明确病毒防治产品的生产销售要求,落实单位与个人的病毒防治责任。
-
《计算机信息系统安全保护条例》:1994 年国务院发布、2011 年修订,我国计算机系统安全保护的基础性行政法规,确立计算机信息系统等级保护、安全监督等核心制度。
九、基础设施安全
-
《中华人民共和国密码法》:2020 年 1 月 1 日施行,我国密码领域基础性法律,将密码分为核心密码、普通密码、商用密码三类,确立分类管理、应用促进、安全保障制度。
-
《商用密码管理条例》:1999 年发布、2023 年修订施行,细化《密码法》要求,规范商用密码科研、生产、销售、服务、进出口全链条管理,推进商用密码应用创新。
-
《商用密码应用安全性评估办法》:国家密码管理局发布,规范商用密码应用安全性评估(密评)工作,明确评估范围、流程与标准;关基系统、等保三级以上系统需按要求开展密评。
-
《互联网用户账号信息管理规定》:2022 年 8 月施行,规范账号注册、使用与管理,要求账号信息真实合规,禁止假冒仿冒账号,落实账号实名制与信息展示要求。
-
《互联网用户公众账号信息服务管理规定》:2017 年发布、2021 年修订,规范公众号、短视频账号等公众账号服务,明确平台与运营者的内容审核、分类管理、实名认证责任。
-
《关于加强无线网络安全管理的通知》:规范公共场所、企事业单位的无线网络安全管理,要求落实安全防护技术措施,防范网络攻击与信息泄露。
-
《互联网域名管理办法》:2017 年 11 月施行,工信部发布,规范域名注册、解析、服务机构管理,落实域名实名制,保障域名系统安全稳定。
-
《国家信息化领导小组关于加强信息安全保障工作的意见》(中办发〔2003〕27 号):2003 年发布,我国信息安全保障工作的纲领性文件,确立 “积极防御、综合防范” 方针,搭建国家信息安全保障体系顶层框架。
-
《互联网安全保护技术措施规定》:2006 年 3 月施行,公安部发布,明确互联网服务提供者、联网单位必须落实的安全技术措施,包括日志留存、有害信息防治、网络防护等。
-
《中华人民共和国电子签名法》:2005 年施行、2019 年修订,确立电子签名的法律效力,规范电子签名行为,保障电子交易安全。
-
《中华人民共和国电信条例》:2000 年发布、多次修订,电信行业基础性行政法规,规范电信市场秩序与服务,明确电信网络安全保护要求。
-
《互联网信息服务管理办法》:2000 年发布、多次修订,确立互联网信息服务分类许可制度(经营性 ICP 许可、非经营性 ICP 备案),明确服务提供者的内容安全与安全保护义务。
十、数据安全专项
注:《数据安全法》已在 “三法一条例” 章节介绍,此处补充剩余两项。
-
《数据出境安全评估办法》:2022 年 9 月施行,明确数据出境安全评估的适用场景、申报流程、评估内容与监管要求;关基运营者、处理大量个人信息的主体等,数据出境需通过国家网信部门安全评估。
-
《网络数据安全管理条例》:2025 年 1 月 1 日施行,国务院发布,衔接 “三法” 要求,细化网络数据分类分级、数据处理者安全义务、重要数据保护、数据跨境、监测预警等规则,是数据安全领域核心配套行政法规。
十一、AI 合规
-
《生成式人工智能服务管理暂行办法》:2023 年 8 月施行,我国首部生成式 AI 专门监管规章;确立生成式 AI 服务备案制度,规范训练数据、内容生成、算法安全、个人信息保护,实行分级分类监管。
-
《互联网信息服务算法推荐管理规定》:2022 年 3 月施行,规范算法推荐服务;要求提供者落实算法安全责任,保障用户知情权与选择权,禁止算法歧视、诱导沉迷等行为,明确算法备案要求。
-
《最高人民法院关于审理使用人脸识别技术处理个人信息相关民事案件适用法律若干问题的规定》:2021 年 8 月施行,针对人脸识别民事侵权纠纷,明确侵权认定标准、举证责任与责任承担,强化人脸信息司法保护。
十二、区块链合规
《区块链信息服务管理规定》
2019 年 2 月施行,网信办发布。
- 核心内容:确立区块链信息服务备案制度,明确服务提供者的主体责任、内容审核义务与安全保障要求,禁止利用区块链从事违法违规活动,规范区块链信息服务健康发展。